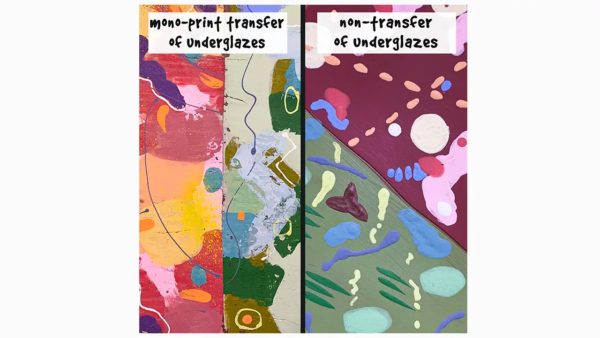
A great way to create a unique and quite colorful surface design in ceramics is through the use of the mono-printing process with underglazes. In the video, I take you through my step-by-step process: considering which colors to choose, prepping the clay, applying different layers of underglazes, transferring the image onto a clay slab, turning a flat painted slab into a bowl, and etching in the details using a technique called sgraffito. The final result is a functional ceramic bowl full of depth, color and an original design.
I learned about mono-printing a number of years ago in a class about creating image transfers – there are several techniques that fall under this category – and I often refer to the process as image transferring.

What I really love about it is the end result, which leaves a bit of texture on the created design. If you painted directly onto a slab of clay with underglazes (thus a non-transfer), layering one color on top of another, the colors are opaque and flat looking – almost like a cartoon.
When you create a mono-print on paper, layering from the bottom up (difficult to explain in words alone, I mean the first layer of glazes that eventually become the bottom layer on the paper, will be the top layer once the paper is flipped over and applied to a clay slab), you can see places on the transfer where the glaze is missing, or the paper has pulled away some of the layer of glazing. This is the texture I am talking about.
The resulting slab can be made into many different wares: a bowl, a platter, a planter, even a mug. Some have suggested I turn some of my mono-prints into wall hangings. If you do make a mono-print, I’d love to see what you have created – be sure to tag me (@rgerendasy) on Instagram! Happy clay-making!

